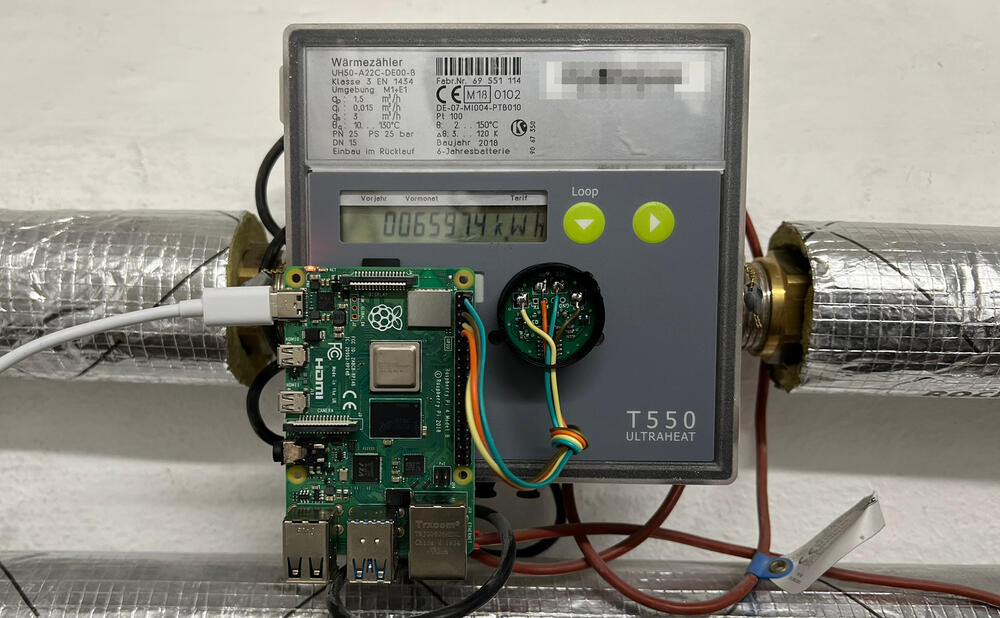
Landis Gyr ULTRAHEAT with volkszahler

I use a Landis Gyr ULTRAHEAT®T550 (UH50) meter to measure my district heating consumption. As I have used “smart” technology throughout my home, I also wanted to integrate this meter, enabling me to collect and later display its measurements.

During my research on how to get values from the meter, I came across the Volkszähler project. Conveniently, there was an existing wiki entry specifically for the UH50 meter. After ordering all the necessary parts, I found some free time between Christmas and New Year’s to put everything together.

  1. Hichi IR Reader Head
  2. Raspberry Pi 4B
  3. 32 GB SD Card
  4. 4 Jumper wires
  5. 5 V USB Charger + USB-C Cable
  6. Soldering iron and solder

Raspberry Pi and hardware preparation

I installed the Volkszähler Pi image, which needs to be unzipping and flashed it using the Raspberry Pi Imager. I utilized the first serial port on the Pi, but to enable its use, it was necessary to disable the serial console. This was done by executing sudo raspi-config, then navigating to 3 Interface Options -> I6 Serial Ports and selecting ‘No’ for the login shell to be accessible over serial, followed by ‘Yes’ to enable the serial port hardware (see also screenshots at the end).

To confirm the changes, execute cat /boot/cmdline.txt. The output should resemble the following for a successful configuration:

1
2
3
console=tty1 root=PARTUUID=227ce38f-02 rootfstype=ext4 fsck.repair=yes rootwait # expected result

console=tty1 console=serial0,115200 root=PARTUUID=227ce38f-02 rootfstype=ext4 fsck.repair=yes rootwait # this would be wrong

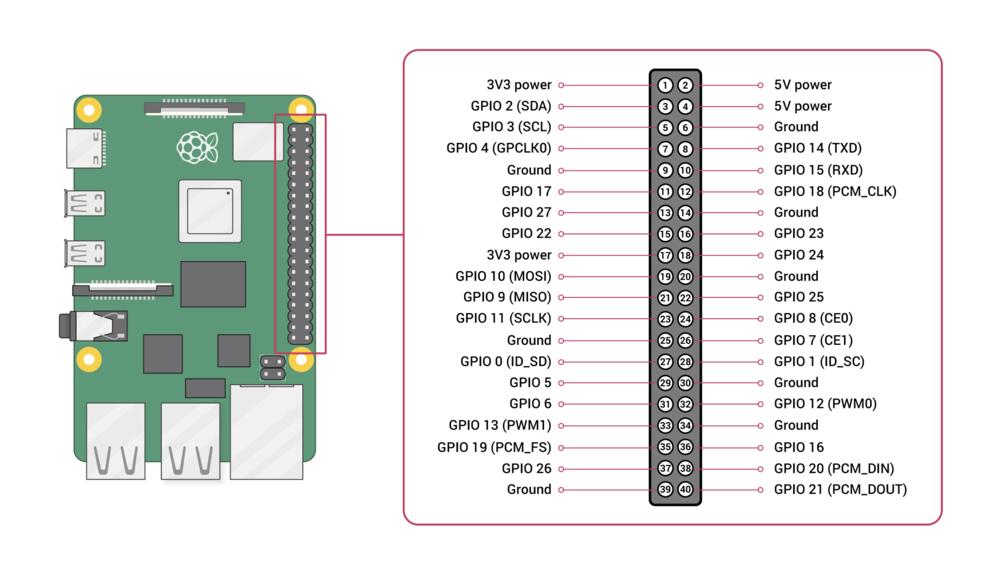
For connecting the IR Reader Head, I used the Raspberry Pi’s pins 4 (5 V), 6 (Ground), 8 (GPIO 14 TXD), and 10 (GPIO 15 RXD). Source Raspberry Pi Ltd (https://www.raspberrypi.com/documentation/computers/raspberry-pi.html)
Because I often forget whether the RX and TX wires should be crossed, I conducted a test. By executing yes > /dev/serial0, data is continuously written to serial0. To verify if the data was being transmitted through the infrared LED, I used my phone camera. While infrared light is not visible to the naked eye, it can be detected by a camera. This method allowed me to confirm the data transmission without directly seeing the IR light.
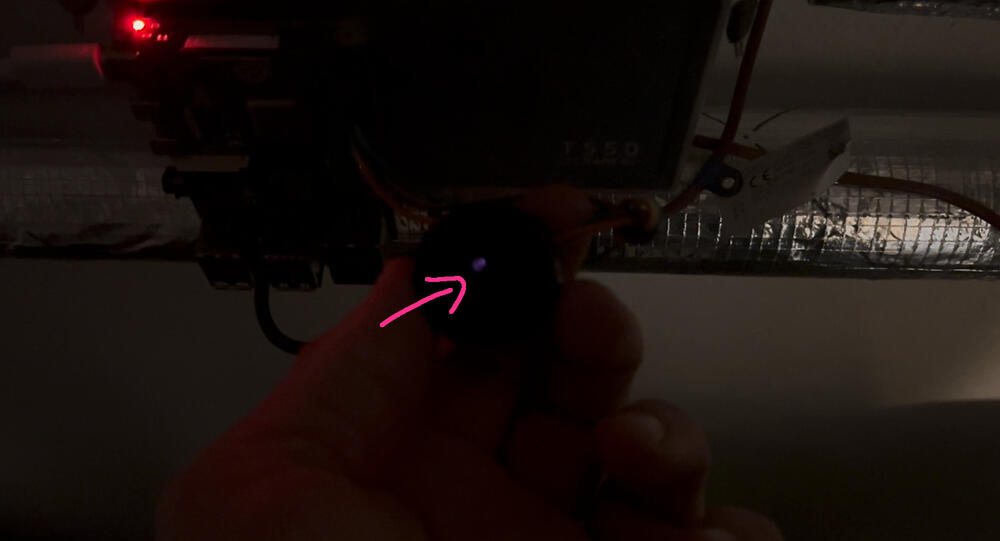
IR light test shot with a phone camera

Having confirmed the functionality of the hardware, I am now ready to proceed with the software setup.

Volkszaehler configuration

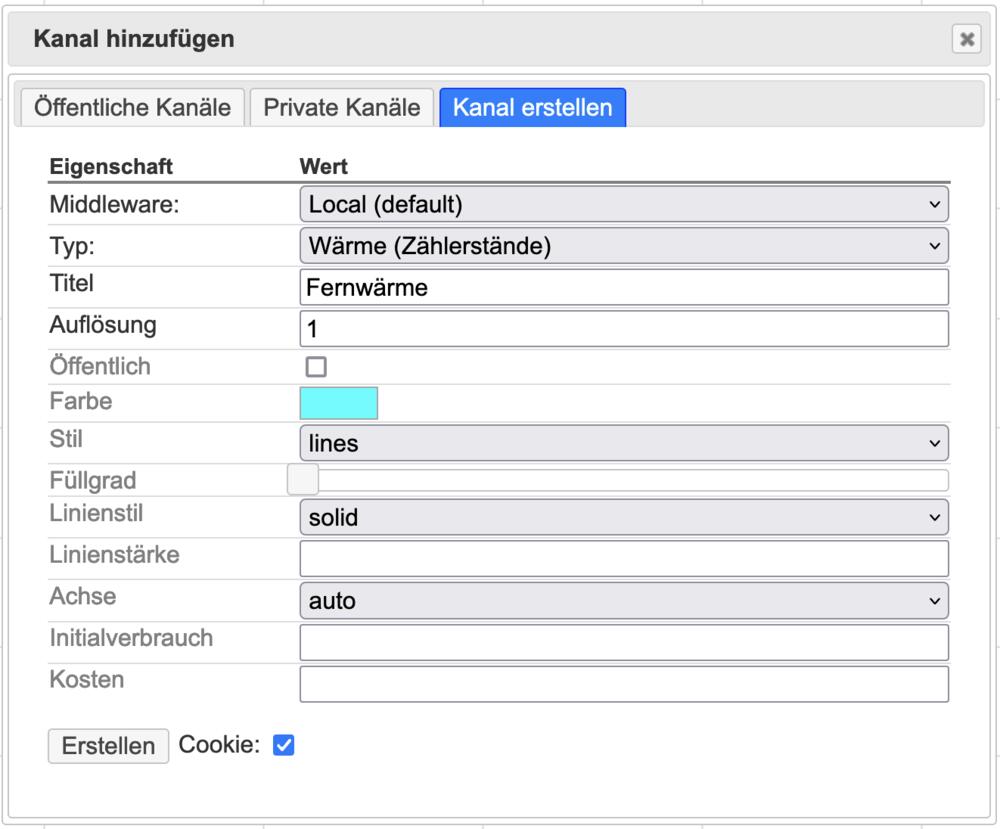
I accessed the Volkszaehler web interface and added two new channels corresponding to the identifiers 6.8 and 6.26, as specified in the configuration example. I then replaced the sample UUIDs in the configuration json with the ones generated for the channels I newly created. Channel creation wizard from the volkszaehler UI
I modified the api to volkszaehler and added the middleware attribute in the channels configuration.

 1
 2
 3
 4
 5
 6
 7
 8
 9
10
11
12
13
14
"channels": [
    {
        "api": "volkszaehler",
        "middleware": "http://localhost/middleware.php",
        "uuid": "8714c9d0-a7f4-11ee-a25f-9907e47d1cf3",
        "identifier": "6.8"
    },
    {
        "api": "volkszaehler",
        "middleware": "http://localhost/middleware.php",
        "uuid": "be8fbd20-a7f4-11ee-a20f-8317f162474c",
        "identifier": "6.26"
    }
]

Starting with the default configuration, I only modified the device setting to /dev/serial0. After applying this change, I restarted the service using the command sudo service vzlogger restart. The log files, located at /var/log/vzlogger/vzlogger.log, showed entries that appeared promising, indicating that the changes were successful.

1
2
3
4
5
6
7
8
9
[Dec 31 14:03:17][d0]   Failed to parse obis code (F)
[Dec 31 14:03:17][d0]   Failed to parse obis code (6.6*01)
[Dec 31 14:03:18][d0]   Failed to parse obis code (6.32*01)
[Dec 31 14:03:18][d0]   Failed to parse obis code (6.33*01)
[Dec 31 14:03:19][d0]   Failed to parse obis code (9.4*01)
[Dec 31 14:03:20][d0]   Failed to parse obis code (6.36*02)
[Dec 31 14:04:26][d0]   Failed to parse obis code (6.26*01)
[Dec 31 14:04:26][d0]   Failed to parse obis code (6.8*01)
[Dec 31 14:04:26][d0]   Failed to parse obis code (F)

Despite the setup, no values were displayed in the web interface. I encountered a recurring error message: Failed to parse obis code, which was unclear to me. Seeking a solution, I turned to Google and discovered discussions where others faced similar issues with the UH50 meter (discussion one, discussion two). Through this research, I learned about the dump_file parameter, which logs raw serial data. This data provided a deeper insight into the issue I was facing.

 1
 2
 3
 4
 5
 6
 7
 8
 9
10
11
12
13
14
15
16
17
18
19
20
21
22
23
24
25
26
27
28
29
30
##### 28.401897499s (     0 ms) opened
##### 28.403483240s (     2 ms) read
##### 28.403535258s (     0 ms) TCIOFLUSH and cfsetiospeed
<<<<< 28.903745832s (   500 ms) 
00 00 00 00 00 00 00 00 00 00 00 00 00 00 00 00                    
00 00 00 00 00 00 00 00 00 00 00 00 00 00 00 00                    
00 00 00 00 00 00 00 00 2f 3f 21 0d 0a                    /?!      

>>>>> 31.702741312s (  2799 ms) 
2f 4c 55 47 43 55 48 35 30 0d 0a                  /LUGCUH50        

<<<<< 31.903093386s (   201 ms) 
0d 0a                                                              

##### 32.403307126s (   500 ms) usleep cfsetispeed
>>>>> 32.474629312s (    71 ms) 
0d 67 66 26 67 06 06 16 7f 35 33 36 2e 31 31 2a    gf&g    536.11* 
6d 33 29 39 2e 32 31 28 36 39 35 35 31 31 31 34   m3)9.21(69551114 
29 0d 0a 36 2e 32 36 2a 30 31 28 30 30 38 38 37   )  6.26*01(00887 
2e 38 31 2a 6d 33 29 36 2e 38 2a 30 31 28 30 30   .81*m3)6.8*01(00 
34 32 33 37 38 2a 6b 57 68 29 0d 0a 46 28 30 29   42378*kWh)  F(0) 
39 2e 32 30 28 36 39 35 35 31 31 31 34 29 36 2e   9.20(69551114)6. 
33 35 28 36 30 2a 6d 29 0d 0a 36 2e 36 28 30 30   35(60*m)  6.6(00 
31 36 2e 36 2a 6b 57 29 36 2e 36 2a 30 31 28 30   16.6*kW)6.6*01(0 
30 31 36 2e 36 2a 6b 57 29 36 2e 33 33 28 30 30   016.6*kW)6.33(00 
30 2e 33 39 36 2a 6d 33 70 68 29 39 2e 34 28 31   0.396*m3ph)9.4(1 
37 35 2e 38 2a 43 26 30 38 34 2e 35 2a 43 29 0d   75.8*C&084.5*C)  
0a 36 2e 33 31 28 30 30 35 30 31 31 37 2a 68 29    6.31(0050117*h) 
36 2e 33 32 28 30 30 30 35 32 33 35 2a 68 29 39   6.32(0005235*h)9
[..snip..]

It appeared that part of the initial data was being truncated. To address this, I experimented with various parameters and ultimately set the baudrate_change_delay to 400. Following this adjustment, I restarted the vzlogger service. This time, the readings began correctly, starting with the identifier 6.8 and then 6.26, exactly as specified in the vzlogger.conf configuration. These identifiers are likely OBIS codes, a standard for energy metering. (For more detailed information on these identifiers, you can refer to this documentation.)

 1
 2
 3
 4
 5
 6
 7
 8
 9
10
11
12
13
14
15
16
17
18
19
20
21
22
23
24
25
26
27
#####  1.496159107s ( 65102 ms) read
#####  1.496214866s (     0 ms) TCIOFLUSH and cfsetiospeed
<<<<<  1.896477273s (   400 ms) 
00 00 00 00 00 00 00 00 00 00 00 00 00 00 00 00                    
00 00 00 00 00 00 00 00 00 00 00 00 00 00 00 00                    
00 00 00 00 00 00 00 00 2f 3f 21 0d 0a                    /?!      

>>>>>  4.695806475s (  2799 ms) 
2f 4c 55 47 43 55 48 35 30 0a 0a                  /LUGCUH50        

<<<<<  4.896146309s (   201 ms) 
0d 0a                                                              

#####  5.296342549s (   400 ms) usleep cfsetispeed
>>>>>  5.395852308s (    99 ms) 
02 36 2e 38 28 30 30 36 33 30 37 33 2a 6b 57 68    6.8(0063073*kWh 
29 36 2e 32 36 28 30 31 35 33 39 2e 34 34 2a 6d   )6.26(01539.44*m 
33 29 39 2e 32 31 28 36 39 35 35 31 31 31 34 29   3)9.21(69551114) 
0a 0a 36 2e 32 36 2a 30 31 28 30 31 35 33 37 2e     6.26*01(01537. 
34 37 2a 6d 33 29 36 2e 38 2a 30 31 28 30 30 36   47*m3)6.8*01(006 
33 30 30 34 2a 6b 57 68 29 0a 0a 46 28 30 29 39   3004*kWh)  F(0)9 
2e 32 30 28 36 39 35 35 31 31 31 34 29 36 2e 33   .20(69551114)6.3 
35 28 36 30 2a 6d 29 0a 0a 36 2e 36 28 30 30 31   5(60*m)  6.6(001 
36 2e 36 2a 6b 57 29 36 2e 36 2a 30 31 28 30 30   6.6*kW)6.6*01(00 
31 36 2e 36 2a 6b 57 29 36 2e 33 33 28 30 30 30   16.6*kW)6.33(000 
2e 33 39 36 2a 6d 33 70 68 29 39 2e 34 28 31 37   .396*m3ph)9.4(17
[..snip..]

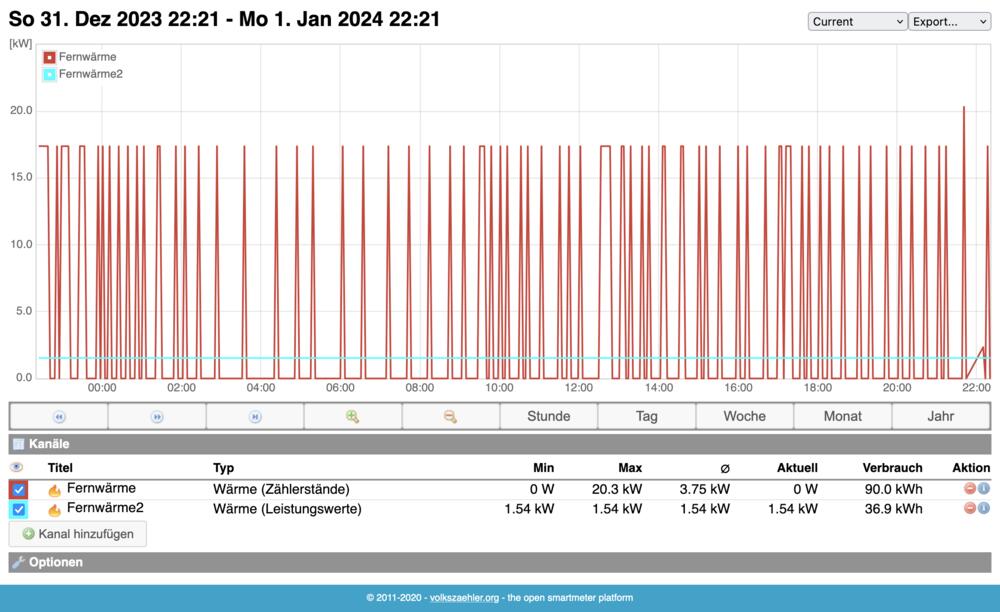
At last, the web UI began displaying values, indicating that the setup was functioning correctly and the adjustments made were effective.
62bc5ff33ba24401bab9262e214a81ab.jpg

While the values displayed in the web UI were not correctly configured and didn’t make much sense, I wasn’t too concerned about it at the moment. My ultimate goal is to have these values feed into an InfluxDB, which I haven’t set up yet. For now, I verified that the meter readings are being stored in the MySQL database on the Raspberry Pi, which is a great start. I will migrate the data to InfluxDB later.

Below is my entire configuration file for reference.

 1
 2
 3
 4
 5
 6
 7
 8
 9
10
11
12
13
14
15
16
17
18
19
20
21
22
23
24
25
26
27
28
29
30
31
32
33
34
35
36
37
38
39
40
41
42
43
44
45
{
  "retry": 0,
  "verbosity": 5,
  "log": "/var/log/vzlogger/vzlogger.log",
  "local": {
    "enabled": true,
    "port": 9000,
    "index": true,
    "timeout": 0,
    "buffer": 0
  },
  "meters": [
    {
      "enabled": true,
      "allowskip": false,
      "interval": 60,
      "aggtime": -1,
      "aggfixedinterval": false,
      "channels": [
        {
          "api": "volkszaehler",
          "middleware": "http://localhost/middleware.php",
          "uuid": "8714c9d0-a7f4-11ee-a25f-9907e47d1cf3",
          "identifier": "6.8"
        },
        {
          "api": "volkszaehler",
          "middleware": "http://localhost/middleware.php",
          "uuid": "be8fbd20-a7f4-11ee-a20f-8317f162474c",
          "identifier": "6.26"
        }
      ],
      "protocol": "d0",
      "device": "/dev/serial0",
      "dump_file": "/var/log/vzlogger/dump_file.log",
      "pullseq": "000000000000000000000000000000000000000000000000000000000000000000000000000000002F3F210D0A",
      "ackseq": "0D0A",
      "baudrate": 300,
      "baudrate_read": 2400,
      "parity": "7e1",
      "read_timeout": 10,
      "baudrate_change_delay": 400 // changed from 500
    }
  ]
}

Outlook

I have future plans to enhance the system. My objective is to transition from the Raspberry Pi setup to directly integrating the meter readings into my KNX home automation bus. To facilitate this, I intend to use the MiniBCU from the OpenKNX project. This will allow a direct connection of the IR Head to the KNX bus, streamlining the data integration into my home automation system.

Note: While I documented everything it was a little late already. I may missed some details. If so let me know :)